I learned a little tip this week - how to transfer a pattern, text or image to clay from paper. This was originally shown to me as a way of transferring text to clay to make a "chop" so that the text is backwards, but I used this method to transfer a pattern I drew on newsprint to a rolled slab to make a hand-built spout for a soft slab vessel I made today. First you draw out your pattern or text onto newsprint or other paper. Trace over the design with a
non-permanent Staedtler marker. Then place the paper face down on your clay, rub over the surface where the line is and ta da ... the image or text is transfered! I had a video but I cannot seem to post it.
Here is the final soft slab pot I created. the body shape was inspired by a Margaret Bohls teapot. Check out this link for instructions on how to make her teapot on Ceramic Arts Daily.
http://ceramicartsdaily.org/pottery-making-techniques/handbuilding-techniques/drawing-in-space-how-to-handbuild-an-expressive-teapot-set-using-soft-slabs/

The body was made with an oval slab and 4 triangle shapes were cut from the top and then the pieces attached to each other, narrowing the top and creating pointed darts in four sections.
I added a textured section on the top, a hand-built spout I made from a paper pattern roughly the shape of a whale tail (also inspired by Margaret Bohl's teapot), and finally a curled handle and feet to lift it off the table. A little bit more texture and lines and it was complete.
Not bad considering I was going to give up after I completed the darting!

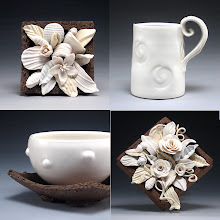
 To make this style I made a simple upright bowl. I then cut out a section, textured it and re-added it to the bowl. I altered the rim and pressed it in. I think next time I will make a more obvious shape for the cut out similar to the cups I made last weekend which I will post as well. This bowl was made with Coleman Porcelain, Cone 10.


.jpg)